Getting Started
First, let's set up your coding environment. CodePen is a free online code editor where you can write HTML, CSS, and JavaScript and see the results instantly.
Create a Free CodePen Account
Go to CodePen and sign up for a free account. This allows you to save your projects (called "Pens") and share them.
Visit codepen.ioCodePen is popular with web developers for quickly testing ideas and sharing code snippets. Your account is free forever!
Start a New Pen
Once signed in, click "Create" in the top navigation and select "New Pen." You'll see three panels at the top: HTML (left), CSS (middle), and JS (right). The bottom shows your live preview.
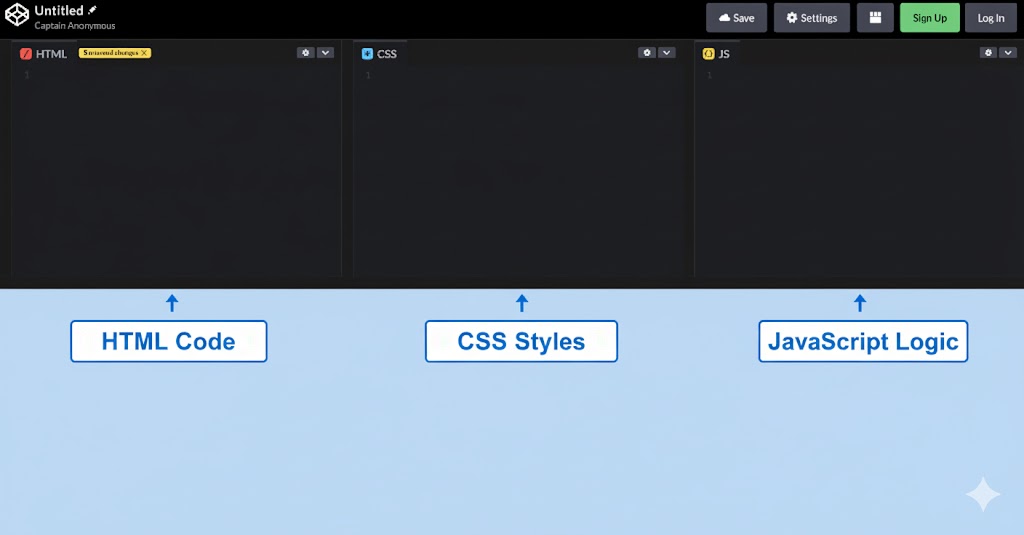
You'll mainly work in the HTML and JS panels today. The CSS panel is for styling — we'll keep it simple for now.
Step 1: Displaying Text
Let's start with the basics — displaying text on a web page using HTML.
Add a Heading
Click in the HTML panel (top-left) and type the following code:
<h1>Hello World</h1>The <h1> tag creates a "heading level 1" — the biggest heading. The text goes between the opening <h1> and closing </h1> tags.
Check Your Result
Look at the preview area at the bottom. You should see large bold text that says "Hello World". The <h1> tag creates a main heading.
Hello World
Your first HTML heading!
If nothing appears, make sure you typed the code exactly as shown, including the angle brackets < and >.
Step 2: Adding a Greeting Message
Now let's add a paragraph with a greeting message below the heading.
Add a Paragraph
Add this code below your <h1> tag:
<p>Hello friend, nice to meet you!</p>The <p> tag creates a paragraph. Your HTML panel should now have two lines: the <h1> on top and the <p> below it.
Check Your Result
You should now see the heading and a greeting message below it. The <p> tag creates a paragraph of text.
Hello World
Hello friend, nice to meet you!
A heading with a greeting message
Notice the paragraph text is smaller than the heading. HTML uses different tags to show the importance and size of text.
Step 3: Creating a Button to Show/Hide the Message
Let's make things interactive! We'll add a button that shows and hides the greeting message.
Add an ID to the Paragraph
First, update your paragraph to give it a unique name (called an "id") so JavaScript can find it. Change your paragraph to:
<p id="greeting">Hello friend, nice to meet you!</p>An "id" is like giving your element a name tag. JavaScript will use this name to find and change the element. IDs must be unique — no two elements should have the same id.
Add a Button
Add this button code between your <h1> and <p> tags:
<button onclick="toggleGreeting()">Show/Hide Greeting</button>The onclick="toggleGreeting()" tells the browser: "When someone clicks this button, run the function called toggleGreeting."
Add the JavaScript
Now click in the JS panel (top-right) and add this code that runs when the button is clicked:
function toggleGreeting() {
  var greeting = document.getElementById("greeting");

  if (greeting.style.display === "none") {
    greeting.style.display = "block";
  } else {
    greeting.style.display = "none";
  }
}
This code creates a "function" — a reusable block of code. It finds our paragraph by its id, then checks if it's hidden. If hidden, show it; if visible, hide it.
Test It!
Click the "Show/Hide Greeting" button. The message should disappear and reappear each time you click!
Hello World
Hello friend, nice to meet you!
Click the button to toggle the greeting
If clicking does nothing, check that the function name in onclick matches exactly what you wrote in the JS panel (toggleGreeting).
Step 4: Adding a Text Box for the User's Name
Now let's personalize the greeting by letting users enter their name!
Add a Text Input
Add this input box after your <h1> tag and before the button:
<input type="text" id="nameInput" placeholder="Enter your name">The <input> tag creates a text box. The placeholder text shows what to type but disappears when you start typing. We gave it an id so JavaScript can read what the user types.
Update the Button
Change your button to call a new function:
<button onclick="showGreeting()">Say Hello</button>We're changing the button to call a new function (showGreeting) that will do something different — update the greeting with the user's name.
Update the JavaScript
Replace all the code in your JS panel with this new code:
function showGreeting() {
  var name = document.getElementById("nameInput").value;
  var greeting = document.getElementById("greeting");

  greeting.innerHTML = "Hello " + name + ", nice to meet you!";
}
The .value property reads what was typed in the input box. The .innerHTML property changes the text inside an element. The + symbol joins text pieces together.
Test It!
Type your name in the text box and click "Say Hello". The greeting should now include your name!
Hello World
Hello Sarah, nice to meet you!
A personalized greeting with your name!
Try clicking "Say Hello" without typing a name — you'll see "Hello , nice to meet you!" This is normal! In real apps, we'd add checks for empty inputs.
Step 5: Save Your Work
Don't lose your creation! Save it to your CodePen account.
Save Your Pen
Click the "Save" button in the top-right corner of CodePen. Your Pen will be saved to your account and you'll get a unique URL you can share.
Once saved, you can share the URL with friends or family to show them what you built! They'll be able to see and try your greeting card.
Give It a Title
Click on "Untitled" at the top of the page and rename your Pen to something like "My Greeting Card" so you can find it later.
Good naming helps you stay organized. As you create more Pens, descriptive titles make it easy to find your work.
Practice Challenges
Now that your greeting card works, try these modifications to learn more:
- Change the greeting to say "Welcome" instead of "Hello"
- Add a second paragraph below the greeting with a fun fact about yourself
- Try adding a "Clear" button that resets the greeting to its original message
- Change "Hello World" to your own custom heading
Don't be afraid to experiment! If something breaks, you can always undo with Ctrl+Z (or Cmd+Z on Mac).
Lesson Complete
Congratulations!
You've completed this lesson. Here's what you learned:
Continue Learning
What's Next?
You're ready for a comprehensive, structured learning path! We recommend freeCodeCamp's Responsive Web Design Certification — a completely free, self-paced course with hundreds of interactive exercises. Upon completion, you'll earn a verified certification that you can add to your LinkedIn profile or CV to showcase your skills.
Learn More